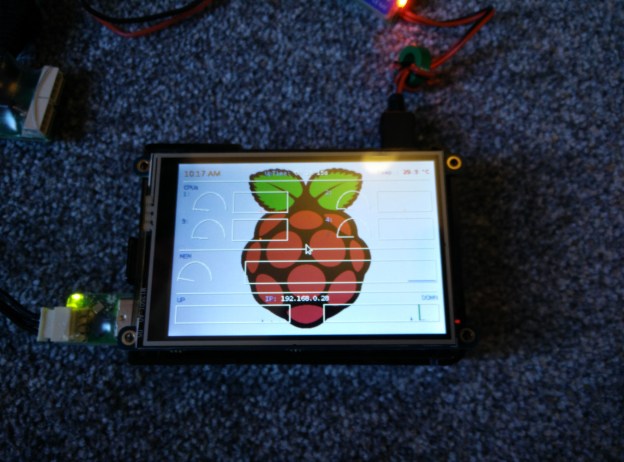
I thought I’d share my Conky configuration currently running on my Pi for anyone interested, as it’s a great tool for displaying useful system information on the desktop. It’s designed for a 480×320 resolution screen, as it is running on this touchscreen, and it takes up all the available space on the Raspbian desktop, minus the menu bar (26 pixels high).
One problem that took me quite a while to solve was how to actually get Conky to launch at startup, as none of the usual methods seemed to work. In the end I found two ways of calling a startup script. First, create a simple Bash script, like this:
#!/bin/bash
sleep 10 && conky -c ~/Scripts/.conkyrc_raspberry-pi-2 -d
Save it e.g. as ~/Scripts/startConky.sh. Then, make the script execute at startup in one of the following two ways:
- Open the file /etc/xdg/lxsession/LXDE-pi/autostart as sudo, and add the following line to the end (solution found here):
@~/Scripts/startConky.sh
- Alternatively, create a file ~/.config/autostart/startConky.desktop, which contains the following lines (as explained here):
[Desktop Entry]
Name=conky
Type=application
Exec=/home/pi/Scripts/startConky.sh
Here are some screenshots of Conky in action. Feel free to use my config however you want!
My Conky config:
# Conky config file

# Avoid flicker
double_buffer yes

# Window
# Own window to run simultaneous 2 or more conkys
own_window yes
own_window_type normal
own_window_hints undecorated, below, sticky, skip_taskbar, skip_pager
#own_window_transparent yes

# Borders
draw_borders no

# Shades
draw_shades yes

# Position
gap_x 0
gap_y 34
alignment top_middle

# Behaviour
update_interval 2

# Font
#font arial
use_xft yes
#xftfont arial:size=8
xftfont Bitstream Vera Sans Mono:size=8
#xftfont Terminus:size=8
xftalpha 1 # Text alpha when using Xft

# Colours
#default_color d1d3c9
#default_shade_color 000000
own_window_colour 2B2B2B

# Prevent window from moving
use_spacer none

# Minimum size of window
minimum_size 464 280

# Maximum width of window
maximum_width 464


TEXT
${font Arial:size=12}${color #ddaa00}${time %I:%M %p}${font}            $alignc${color #9fb6cd}UpTime: ${color }$uptime $alignr${color #9fb6cd}Temp.: ${color ff0000}${execi 2 vcgencmd measure_temp | sed 's/[^0-9.]*//g'} °C
${color }${hr}
${color #9fb6cd}CPUs${color }
${color #9fb6cd}1: ${color }${cpugauge cpu1 30, 60}  ${cpugraph cpu1, 30, 125 ffff00 ff0000 -t} $alignr${color #9fb6cd}2: ${color }${cpugauge cpu2 30, 60}  ${cpugraph cpu2, 30, 125 ffff00 ff0000 -t}
${color #9fb6cd}3: ${color }${cpugauge cpu3 30, 60}  ${cpugraph cpu3, 30, 125 ffff00 ff0000 -t} $alignr${color #9fb6cd}4: ${color }${cpugauge cpu4 30, 60}  ${cpugraph cpu4, 30, 125 ffff00 ff0000 -t}
${color }${hr}
${color #9fb6cd}MEM
${color }${memgauge 30, 60}  $alignr${memgraph 30, 380 0000ff ffff00 -t}
${color }${hr}
${color #9fb6cd}UP $alignc${color #9fb6cd}IP: ${color }${addr wlan0} $alignr${color #9fb6cd}DOWN
${color }${upspeedgraph wlan0 30, 220 0000ff ff0000 -t} $alignr${downspeedgraph wlan0 30, 220 0000ff 00ff00 -t}