Category Archives: 3D printer

Reprap is live again!

After a long delay, the RepRap has finally been re-assembled and sprung into life to produce some first calibration parts!

Here are a few shots of the completed printer, including an additional protective glass plate over the heating PCB, which also makes cleaning of the printing surface easier.

 The completed Reprap Prusa Mendel.

The curved plastic tubes on top of the printer are actually plastic water pipes with crocodile clips attached to them, which were a perfect fit onto the top threaded M8 rods. They make a great set of spare hands for holding various things in place, such as the plastic filament spool.

Next are some images of the first calibration prints. Up to this point the calibration process has been fairly painless, as it is using the calibration settings of its parent Prusa, however minor tweaks will be needed to improve the print quality.

The set of very test first calibration parts that were printed out.

A further set of calibration parts, trying a new plastic filament.

The print quality actually starts to degrade at the upper levels, which is very likely linked to the fact that the bolts which hold the PTFE barrier in place (see the mod that was done back at the start of the printer build), become very loose as the print progresses. As a result, the shaking of the extruder tip may be causing the loss of precision. Also, the x-axis idler has taken some damage, possibly due to the tension of the x-axis belt, which is causing misalignment, let alone the fear that it might break at any point!

Damage to the x-axis idler.

Until these issues have been solved, here is the first video of printing in action:

Wiring the electronics, testing the motors and heating up the extruder

With the mechanical part of the RepRap largely completed, the next step was to wire up the electronics.

I had underestimated the amount of wiring required for the printer, so I braided the wire before wrapping it around the printer’s frame in an attempt to keep it as neat as possible. The wires have to be kept away from many moving parts, hot points, etc. Keeping them isolated should also minimise any cross-talk noise between the large lengths of cable. However, as the printer is going to have to be disassembled, packed and moved in the near future, I haven’t fixed the wires up with cable-ties yet.

The Danguinololu successfully communicated  motor and temperature signals so everything seems in order, except for the extruder motor which is behaving in an irrational manner and only intermittently accepting movement signals in one direction. Leaving this problem aside, I moved on to testing the heated extruder tip.

The heated tip temperature was incremented in steps up to 210 °C, while manually feeding some PLA plastic into the extruder. The plastic flows out of the tip effortlessly at around 200 °C, so things are looking positive for the extruder assembly! The remaining step is to calibrate a working motor to extrude plastic at the right speed for printing.

As I’m experiencing some issues with one of the motors, unfortunately the long-awaited calibration and test-printing stage has to wait!

Completing the axes and print table

Some further progress on the RepRap build this weekend. The frame is now complete and awaiting electronics (sneak peek in the last picture)!

Main updates have been:

  • The x-carriage plastic parts were reinforced with some Sugru as the vertical columns seemed weak and flexed with little force. The carriage was completed and mounted to the frame. The z-axis motors were attached to the top of the frame and connected to the x-carriage via the new-style couplings.
  • The MDF wood top plate was attached to the bottom plate and can freely tilt via the corner springs. This allows the printing area to move under pressure, ensuring that the frame and extruder will not get damaged if the extruder happens to get lowered too far onto the print area. The heated bed (wired-up previously) was attached to the top wood plate, with all thermistor wiring tucked in-between.
  • The extruder tip was attached to Wade’s extruder. Another strengthening mod here should ensure that the extruder PTFE barrier doesn’t get pushed out of the extruder by the force of incoming molten plastic, something which has happened with printer #1! The complete extruder assembly is now mounted on the x-carriage.

Further progress on extruder and axes

Extruder

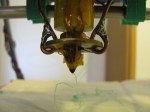
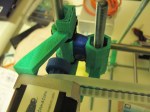
First off, the idler block was attached to the extruder. Simple job and the extruder is almost complete! I’ll return to it again later.

The idler block is attached to the extruder at the top with two long (40 mm) M3 bolts. The hinged bottom pivots on another M3 bolt (need to cut the excess thread or use a more suitable size).

Y-axis assembly

Assembly of the y-axis started by attaching the appropriately sized print bottom plate to the bushings which run along the smooth guiding rods. The bushings were glues onto the plate with two-part epoxy.

For all five stepper motors, we chose the NEMA 17  SY42STH47-1684B model, which provides the required torque for all axes as well as extruder.

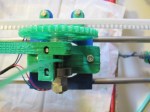
The y-axis motor was attached to the y-bracket on the RepRap frame. The rapid prototyped (RP) pulley was also attached and secured to the motor shaft with an M3 grub nut and hex bolt.

Print bottom plate. The timing belt is secured onto the plate using two RP belt clamps.

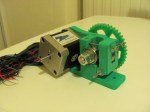
Close-up of y-axis motor, pulley and timing belt. The motor is attached to its bracket with three M3x10 mm hex bolts.

You might notice that the motor is mounted on the side of the y-bracket opposite than that shown in the instructions. This is actually because, due to a small hiccup, my y-bracket was printed as a mirror-image of the original STL part (this is also the case for some of the x-axis parts as you’ll see later). The reason I had to mirror the motor position, is because the side of the y-bracket on which the motor should sit has recesses for the M3 hex bolt heads. The M3x10 mm bolts are too short to secure the motor if it’s mounted on the other side. Later on I will simply have to mirror the y-axis movement direction in the control software.

The final step was to mount the timing belt in place using belt clamps and M3x25 mm bolts with washers. Enough tension is needed so that the belt doesn’t sag and the print bottom belt moves smoothly along the guiding rods.

X-axis assembly

As noted previously, the x-axis end parts are also mirror-prints of the originals, hence the assembly will have to be adjusted accordingly. This however shouldn’t have any impact on the functionality of the printer.

The first step was to attach the smooth rods to the x-end parts. Some filing was in order to get the rods to squeeze in. I believe the x-end parts you see here are the versions which use LM8UU metal linear bearings (similar to the ones here), although I will be using RP plastic bearings instead. These RP parts don’t have long channels travelling all the way through them, so the rods can only slide in up to a point. They attach firmly on each side, without the use of M3 bolts. However, this means that the distance between the x-ends is essentially fixed, so later on the z-motor mounts on the top threaded rods will have to be adjusted accordingly.

Smooth rods attached to the x-end-motor and x-end-idler RP parts.

Close-up of the x-idler bearing over which the x-axis timing belt is mounted.

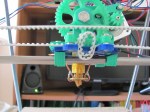
The x-axis carriage mounted onto its guiding rods.

Attaching the idler bearing to the x-end-idler was a straightforward. The M8x50 mm bolt was used as a suggested alternative in place of a plain threaded bolt.

Next, the x-axis carriage was attached to the guiding rods. The blue carriage you see above is missing its bushings (print hiccup), so they were printed separately and glued on. The timing belt clamps are the same as the ones on the y-axis belt.

Before the x-axis carriage is mounted onto the z-axis vertical smooth rods, the latter have to be inserted into the RepRap frame.

Z-axis assembly

A plumb-line helped to line up the rods with the bottom bar-clamps. The top rod-clamps were attached to the z-motor holders using M3x25 mm bolts and respective washers. The bolts were placed with shafts pointing outwards from the frame, to avoid interference with the motors which will sit next to them later on.

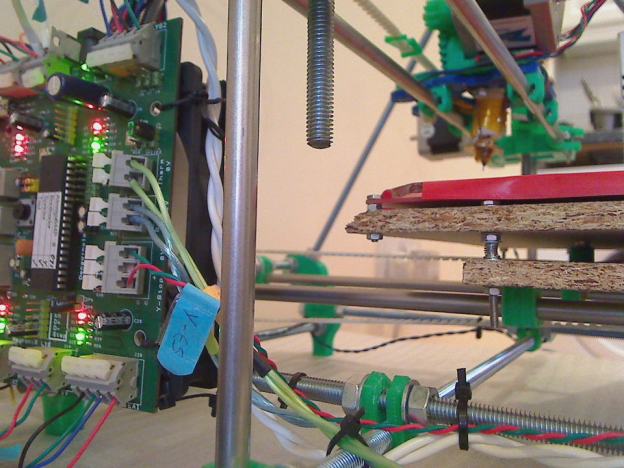
Close-up of Z-axis motor mount and attached vertical smooth rod.

In the next stage, the x-axis carriage and remaining motors will be attached to the RepRap frame!

Wiring up temperature sensors for heated bed

Next on the list was wiring up and soldering the temperature sensors (thermistors) to the heated bed PCB. Since the heated bed covers a fairly large area, I’ve used a combination of 4 to provide a mean value for the temperature across the bed. By wiring up two thermistors pairs in series and then in parallel as shown in the drawing and pictures, the overall resistance, and in effect temperature, provides a form of “averaged” value. If all thermistors register the exact same temperature and have the same resistance, the result  is the same at the output of the  whole circuit.

Layout diagram for the four thermistors wired in series and parallel. The thermistors’ total output resistance results in an averaged temperature reading.

Top view of all four thermistors wired.

Central thermistor. Heat-resistive Kapton tape holds down the thermistors on the heated bed.

Corner thermistor.

I put the thermistors roughly in place first using normal tape, in order to measure wire lengths and solder with ease.  The soldered joints should be fine as the heated bed has to reach around 110°C for ABS plastic and 60°C for PLA plastic, whereas solder melts at around 180°C. The thermistors were finally to the heated bed with heat-resistive Kapton tape.

Next, I should have the remaining parts needed to continue building the frame!

Extruder continued and start of RepRap frame

Continuing from the first post, I made some progress on the extruder while also starting construction on the RepRap frame.

For the extruder idler block, a piece of threaded rod was cut down to size. Based on instructions this should have been smooth rod, but since it simply sits through a bearing there isn’t any issue of friction.

Fitting two hex nuts to the top of the extruder where the idler is attached required some extensive filing which ended up in the plastic splitting at the weakest points and a small part of the plastic breaking off, but the issue was easily fixed with some two-part epoxy. Once the epoxy has set and I get the required M3 bolts, the extruder assembly can be completed.

Extruder idler block, 608 bearing and a threaded bolt piece sawed to the right size (2 cm).

Fitting the M3 nuts into the top of the extruder (drill bits used as rough guides).

Repairs on one of the bolt holes using epoxy glue..

Switching to the frame construction for a change of scenery, the first task is to put together the two “frame vertex triangle”, i.e. the triangular frames which make up two opposing sides of the printer.

The first frame vertex triangle

Both frame vertex triangles completed.

Next, the frame starts taking shape by connecting the two vertex triangles. A few more threaded rods attached and it starts looking like an actual printer!

The frame taking shape

Close-up of one side.

Close-up of side with bracket where y-axis motor will be mounted.

Top view of the frame, with z-motor mounts on either side.

Basic frame connected, before calibrating and tightening.

The frame remains untightened for now, as I need to replace the large washers (M8, 24 mm diam.) on either side of the 608 bearings with even larger ones (M8, 30 mm diam.).

Next step will be to calibrate the frame, start attaching the remianing rods and complete the extruder. Coming up soon!

Prusa Mendel building begins

This is the first post in a series which will cover the build process of a Prusa Mendel 3D printer.

The Prusa Mendel is a fully open-source 3D printer. Its main features are its low cost relative to other 3D printers out there right now, its many interchangeable modules, as well as the fact that one printer can print the required plastic parts for subsequent printers. This last point is where I begin my building work log …

I’ll start off with the plastic parts, which have all been printed using our first printer.

RepRap #1 – The mother

RepRap #2 – The soon-to-be son(?)

The first RepRap has given birth to the (mostly) green parts you see above. Next step, gather all the pieces (easier said than done)!

A collection of almost all of the required RepRap parts and tools.

While I was waiting for the final pieces to be delivered (mainly the long treaded rods and M3 bolts) I decided to start off with the hot end and the extruder.

The hot end main components are a PTFE thermal barrier which attaches to the extruder, the brass barrel which acts as the output nozzle for the melted plastic, the nichrome wire which will provide the heating, and a temperature sensor.

Hot end parts.

Some good instructions for the hot end can be found here (even thought the page is deprecated, it has good instructions on how to construct the thermal barrier and brass barrel, as well as how to wire the up the nichrome wire and temp. sensor). The hot end took a few tries before I was happy with the result. A useful modification we have added is the hex bolt and brass washer with two drilled holes that you can see in the pictures. I’ll later show how these provide a good resistive force which holds the brass barrel firmly into place inside the thermal barrier. From experience we found that the force from the incoming melting plastic tends to push the brass barrel out of the soft PTFE barrier, so this mod solves the problem!

A drawing of the extruder tip assembly.

The assembled hot end.

Another view of the assembled hot end.

The images above show the final assembly (the black insulating tape was replaced with some more high-temp. resistive Kapton tape as it would melt from the high temperatures generated by the nichrome wire). Getting the nichrome wire and temperature sensor to fit around the large washer resulted in an extruder tip which might not look refined, but should get the job done!

The extruder model is an upgraded version of the original Wade’s Geared Extruder (not sure of the exact iteration number, but it’s the the one with the hinged extruder idler block and spoked large gear, but without the filament guide of herringbone gear).

Beginning of extruder assembly

Green Sugru.

Green Sugru opened.

Aligning hobbed bolt with 608 bearings and filament guiding hole.

Large extruder gear with Sugru used to fill in imperfections and hold bolt in place.

Hobbed bolt and large gear in place and correctly aligned.

The hex nut placement on the large gear was slightly out of place. This was promptly fixed by filing down until the bolt fit. Luckily I had some Sugru lying around (and in the right colour!) which worked perfectly in holding the bolt in the correct place with the gear aligned straight. It also helped to keep one of the 608 bearings firmly in place.

This concludes the first post on the build process. Stay tuned!